プレビュー版の情報です。リリース版では異なる場合があります。
Windows 10 からなにやらAppService という機能がサポートされました。ざっくりいうと、バックグラウンドで実行されて、フロントのアプリと通信していろいろできる機能です。AndroidのServiceとほぼ同じもの。というイメージです。
というわけでさっそく作ってみます。最初にBlank Application (UAP)を基にソリューションを作っておきます。
Service側
まずAppServiceの本体を作っていきます。
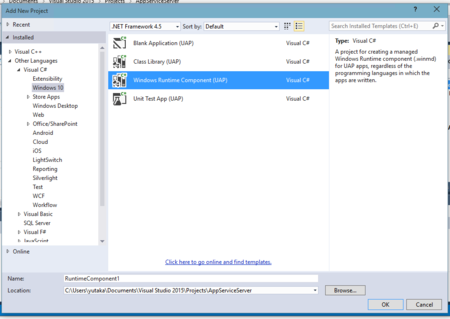
AppServiceの実態は、IBackgroundTaskを継承したクラスを公開しているにすぎません。IBackgroundTaskを実装したアセンブリはWindows Runtime Componentである必要があります。ですので、ソリューションにWindows Runtime Component (UAP)を追加します。

追加したら中身を実装します。
public sealed class AppServiceTask : IBackgroundTask
{
    private static BackgroundTaskDeferral _serviceDeferral;
    public void Run(IBackgroundTaskInstance taskInstance)
    {
        taskInstance.Canceled += TaskInstance_Canceled;
        _serviceDeferral = taskInstance.GetDeferral();
        var appService = taskInstance.TriggerDetails as AppServiceTriggerDetails;
        if (appService.Name == "sampleappservice")
        {
            appService.AppServiceConnection.RequestReceived += AppServiceConnection_RequestReceived;
        }
    }

    private async void AppServiceConnection_RequestReceived(AppServiceConnection sender, AppServiceRequestReceivedEventArgs args)
    {
        var message = args.Request.Message;

        var command = message["Command"] as string;
        switch (command)
        {
            case "DoIt":
                {
                    var messageDeferral = args.GetDeferral();
                    int value1 = (int)message["Value1"];
                    // do something
                    var result = value1 * 2;
                    var returnMessage = new ValueSet();
                    returnMessage.Add("Result", result);
                    var returnStatus = await args.Request.SendResponseAsync(returnMessage);
                    messageDeferral.Complete();
                    break;
                }

            case "Quit":
                {
                    _serviceDeferral.Complete();
                    break;
                }
        }
    }

    private void TaskInstance_Canceled(IBackgroundTaskInstance sender, BackgroundTaskCancellationReason reason)
    {
        _serviceDeferral.Complete();
    }
}
コマンドが文字列で渡されるので適当にswitchで分岐したりいろいろします。ここでのポイントは、RequestReceivedイベントでリクエストを受け取り、args.Request.SendResponseAsync() で呼び出し元に値を返します。
出来上がったらこれを、最初に作ったBlank Application (UAP) の参照に追加します。最後に、Package.appxmanifestを開いて、次のXMLを追加します。
<Applications>
    <Application Id="App"
      Executable="$targetnametoken$.exe"
      EntryPoint="AppServiceServer.App">
        <!-- 追加ここから -->
        <Extensions>
            <uap:Extension Category="windows.appService"
                            EntryPoint="AppServiceImpl.AppServiceTask">
                <uap:AppService Name="sampleappservice" />
            </uap:Extension>
        </Extensions>
        <!-- 追加ここまで -->
    </Application>
</Applications>
ここでEntryPointはWindows Runtime Component (UAP) に追加したクラスのnamespaceを含んだクラス名を指定してください。
クライアント側
AppServiceを利用するアプリを作ります。
MainPage.xaml にこんな感じに書きます。
<StackPanel HorizontalAlignment="Center" VerticalAlignment="Center">
    <TextBlock Text="Number" />
    <TextBox x:Name="Number"/>
    <Button Content="Calc" Click="Button_Click"/>
    <TextBlock Text="Answer"/>
    <TextBlock Text="" x:Name="Answer" />
</StackPanel>
続いてコードビハインドにAppServiceとの通信部分を書きます。
private async void Button_Click(object sender, RoutedEventArgs e)
{
    AppServiceConnection connection = new AppServiceConnection();
    connection.AppServiceName = "sampleappservice";
    connection.PackageFamilyName = "<Application Package Family Name>";
    // サービスへ接続
    AppServiceConnectionStatus connectionStatus = await connection.OpenAsync();
    if (connectionStatus == AppServiceConnectionStatus.Success)
    {
        var message = new ValueSet();
        message.Add("Command", "DoIt");
        message.Add("Value1", int.Parse(Number.Text));
        // コマンドを送信してレスポンスを待つ
        AppServiceResponse response = await connection.SendMessageAsync(message);
        if (response.Status == AppServiceResponseStatus.Success)
        {
            Answer.Text = response.Message["Result"].ToString();
        }
        else
        {
            Answer.Text = "ERROR";
        }
    }
}
ここで、PackageFamilyNameには、AppServiceを含むアプリのPackageFamilyNameを指定します。Service側のアプリで次のコードを実行すると、Visual StudioのOutputで確認することができます。
Debug.WriteLine(Package.Current.Id.FamilyName);
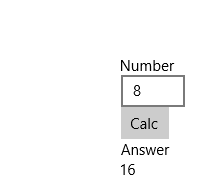
これを実行すると、次のように入力した値を2倍にしてくれるAppServiceが確認できます。
